Hey gals! As I said earlier that I am starting a series of posts that would give some beauty related information from worldwide cosmetics and beauty sites, I come across while surfing the net. So here is the second part of the series and it is also related to nail art :D You may think I am going crazy for nail arts but I have to tell you, I am just amazed with the creativity the polish addicts come up with everyday and thought of sharing the same with all of you and make you go a little crazy for nail-arts like me :D
Today's topic would be Water Marbling.

 |
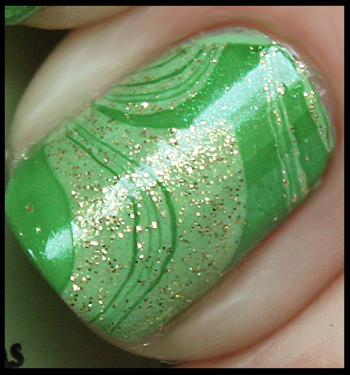
| All images taken from Google |
Don't they just look awesome. Here is the process of how you can do it:
- Fill a shallow, wide-mouthed cup or bowl about 90% full with water.
- Add desired colors of paint to the water. Have your paints open and ready to go, as they will harden quickly on the surface of the water. Drop a drop or two of the colors you want to use on top of the water. A high-quality nail polish works best for this method.
- Create the marbled design in the water. Repeatedly drag a pin or toothpick through the the surface.
- Use a cotton swab to remove the excess polish from the surface while your nail is still submerged in the water.
- Remove nail from water and use a cotton swab (with acetone if necessary), to clean up the edges and remove polish from the finger. (Info From Wiki)
Here are some tutorial videos I liked on YouTube. Go and watch and try them out. Let me know how was it!!
Hope you guys enjoyed the post! :)
P.S: I crossed 60 subscribers...YAY!! Thank you all for reading,commenting and supporting my blog :-*


So neat! I was completely sucked into this post with the picture that came up on my dashboard. I will definitely be trying this out! Thanks for the wonderful post!
ReplyDelete-Candice :)
@Candice...Glad that u liked it :)...I tried but failed to do it as my polishes didn't form the film! Anyways...would try with some other polishes later :)
ReplyDeleteHi great post- though I ,must forewarn you that this technique doesn't work on all nail polishes.At least all the Indian brands I tried didn't work, one that came remotely close to working was Flormar nail polish. For this you need a polish that'll spread evenly & form a thin film on the water surface. Try using some Sally Hansen nail enamel those might work
ReplyDeleteThis looks really fun and creative. Need to check out those videos and try it out :)
ReplyDeleteLove Christine ♥
Whoa!! You can actually do that on nails??? Amazing!! I had always done marble sheets and papers for projects in school.. I am def. gonna try this!! :D :D ... I love the pink and black one! I wish the stock of nail polishes i have don;t disappoint me.. *fingers crossed* :)
ReplyDeleteThank you soooo much for this awesome post!
I have yet to try water marbling. it's so cool.
ReplyDelete@IBC I don't have any Sally Hansen with me :(
ReplyDeleteLets see if I can get my hands on any such brand..I guess OPI would work!
@Christine @Viya @ DInah : Do try it out... :)
My friend tried this on me a while back. It's so fun and easy. The best tip as someone who has tried this is to use the water at room temperature.VERY important. Thanks for sharing.
ReplyDelete@PB Thanks for the tip :)
ReplyDeleteI had tried this once, it looks really pretty when the nailpolish spreads properly on top of water, but its so time consuming I didnt try it again. Nice post Pooja :)
ReplyDeleteI just love the green one! I tried this about 2 times, and each time was a complete fiasco :))). I have no idea what I'm doing wrong and I don't have enough patience to try it again... I just drool over the gorgeous stuff that others do :)).
ReplyDelete(Ah, and you have a lovely blog, by the way;) )
I've seen this & I really wanted to try, but I just kept forgetting :P
ReplyDeleteThe green one is stunning!
i tried doin dis before ... but it failed terribly . . . hehehehe
ReplyDeleteenter my giveaway --
http://sugarspiceandalldatsnice.blogspot.com/2011/08/giveaway-time-my-very-first-giveaway.html
wow wow wow pooja..it just looks awesome
ReplyDeleteYou're welcome sweetie :)
ReplyDeleteLove Christine ♥
@Laksh Atleast u were successful in ur attempt :)
ReplyDelete@Corina LOL! Me failed too....apparently it depends more on the quality of the polishes......n THANK YOU so much for appreciating and subscribing to my blog :-*
@Poohkie Yes it is.
@Rids Join the club....me failed too...more bcoz of the polish I used
@Fahee Thank u :)
@Christine :-*
I loved the last nail paint pic Pooja :D :D luks like alpenlible strawberry toffee to me :P Yummy :P
ReplyDelete@Shweta....yes me thought the same when I saw it for the first time :)
ReplyDeletei absolutely LOVE this techniquueeee!!
ReplyDelete@ClassyandFabulous Glad that u like it and is successful in trying this this out :D
ReplyDeleteWow, haven't heard about it, til you made this post! simply stunning and pretty! i love them! i'm jealous hope i can do the same!
ReplyDelete@Diane do try out..I m sure it will be fun...juz make sure u use good polishes!!
ReplyDeleteI didn't know nail art was this easy until i came across your blog. Thanks for all the research, poo! I might try this at home.... :)
ReplyDeletethanks ondy for liking it :)
ReplyDelete